
uos-machine-learning
파이썬 라이브러리 소개 - imgaug 본문
오늘은 딥러닝 모델을 돌릴 때 Image Data Augmentation을 편하게 해주는 imgaug 라이브러리에 대하여 소개하고자 합니다.
Data augmentation은 학습 데이터의 변조를 통해 좀 더 일반화된 모델을 얻기 위해서 사용하는 기법인데, 그 중에서도 imgaug는 이미지를 augmentation 해주는 효과를 가지고 있습니다.
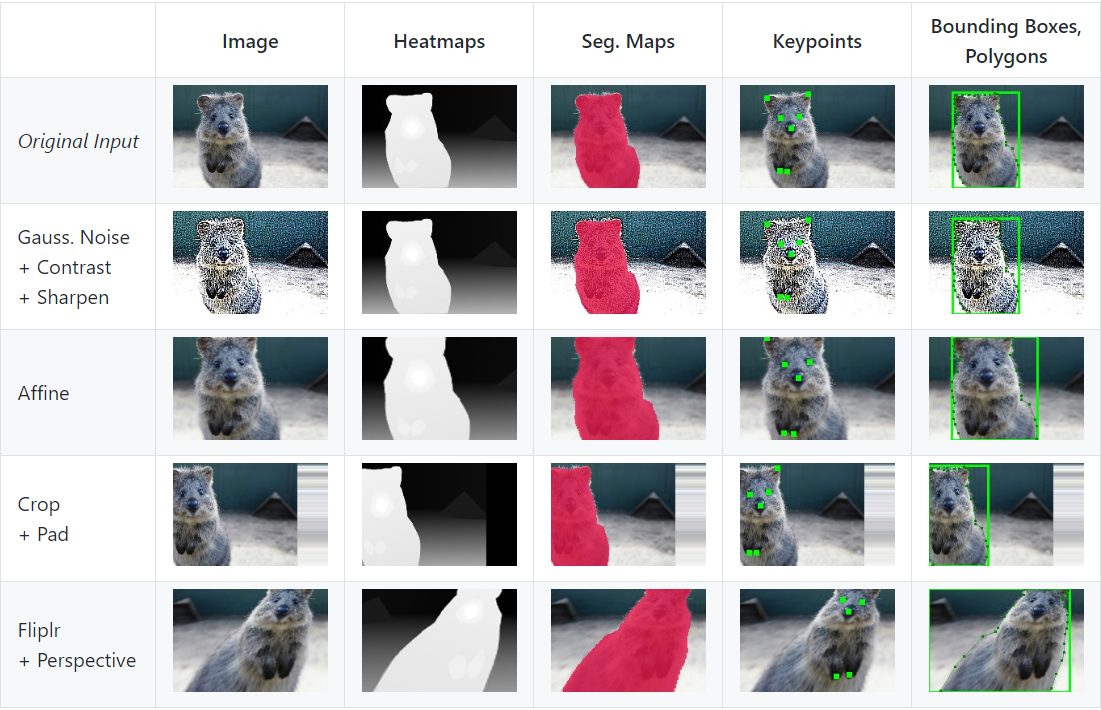
imgaug의 가장 좋은 점은 단순히 데이터를 회전, 노이즈, 확대 등을 할 수도 있지만 anchor box, heatmaps, seg.Maps, Keypoints 등도 같이 적용할 수 있다는 점입니다.
Installation
파이썬 라이브러리다 보니 설치도 매우 쉽게 가능합니다. conda, pip 로 설치가 가능합니다!
Installation : Anaconda
conda config --add channels conda-forge
conda install imgaug
Installation : pip
pip install six numpy scipy Pillow matplotlib scikit-image opencv-python imageio Shapely
pip install imgaug
Example Images
종류는 정말 장난 아니게 많습니다.
https://github.com/aleju/imgaug
aleju/imgaug
Image augmentation for machine learning experiments. - aleju/imgaug
github.com
여기로 들어가 보시면 확인하실 수 있습니다. 아래는 예시입니다.

Code Examples
그럼 어떻게 코드를 적용할 수 있는지 확인해 보겠습니다!
Example: Simple Training Setting
아래는 깃허브에 있는 첫 번째 예제입니다. imgaug.augmenters 객체를 가지고 온 뒤에 Sequential 모델 안에 Augmentation 종류를 넣은 것을 확인할 수 있습니다.
import numpy as np
import imgaug.augmenters as iaa


def load_batch(batch_idx):
    # dummy function, implement this
    # Return a numpy array of shape (N, height, width, #channels)
    # or a list of (height, width, #channels) arrays (may have different image
    # sizes).
    # Images should be in RGB for colorspace augmentations.
    # (cv2.imread() returns BGR!)
    # Images should usually be in uint8 with values from 0-255.
    return np.zeros((128, 32, 32, 3), dtype=np.uint8) + (batch_idx % 255)


def train_on_images(images):
    # dummy function, implement this
    pass


seq = iaa.Sequential([
    iaa.Crop(px=(0, 16)), # crop images from each side by 0 to 16px (randomly chosen)
    iaa.Fliplr(0.5), # horizontally flip 50% of the images
    iaa.GaussianBlur(sigma=(0, 3.0)) # blur images with a sigma of 0 to 3.0
])

for batch_idx in range(1000):
    images = load_batch(batch_idx)
    images_aug = seq.augment_images(images)  # done by the library
    train_on_images(images_aug)
Example: Very Complex Augmentation Pipeline
아래는 조금 더 복잡한 Augmentation에 대하여 설명하고 있습니다. 아래에는 sometimes, SomeOf 같은 명령어도 있는 것을 확인할 수 있는데 이는 Random 하게 augmentation을 수행하게 도와줍니다. 특히, random_order=True 인자는 순서도 바꿔가면서 Augmentation을 할 수 있습니다.
import numpy as np
import imgaug as ia
import imgaug.augmenters as iaa


# random example images
images = np.random.randint(0, 255, (16, 128, 128, 3), dtype=np.uint8)

# Sometimes(0.5, ...) applies the given augmenter in 50% of all cases,
# e.g. Sometimes(0.5, GaussianBlur(0.3)) would blur roughly every second image.
sometimes = lambda aug: iaa.Sometimes(0.5, aug)

# Define our sequence of augmentation steps that will be applied to every image
# All augmenters with per_channel=0.5 will sample one value _per image_
# in 50% of all cases. In all other cases they will sample new values
# _per channel_.
seq = iaa.Sequential(
    [
        # apply the following augmenters to most images
        iaa.Fliplr(0.5), # horizontally flip 50% of all images
        iaa.Flipud(0.2), # vertically flip 20% of all images
        # crop images by -5% to 10% of their height/width
        sometimes(iaa.CropAndPad(
            percent=(-0.05, 0.1),
            pad_mode=ia.ALL,
            pad_cval=(0, 255)
        )),
        sometimes(iaa.Affine(
            scale={"x": (0.8, 1.2), "y": (0.8, 1.2)}, # scale images to 80-120% of their size, individually per axis
            translate_percent={"x": (-0.2, 0.2), "y": (-0.2, 0.2)}, # translate by -20 to +20 percent (per axis)
            rotate=(-45, 45), # rotate by -45 to +45 degrees
            shear=(-16, 16), # shear by -16 to +16 degrees
            order=[0, 1], # use nearest neighbour or bilinear interpolation (fast)
            cval=(0, 255), # if mode is constant, use a cval between 0 and 255
            mode=ia.ALL # use any of scikit-image's warping modes (see 2nd image from the top for examples)
        )),
        # execute 0 to 5 of the following (less important) augmenters per image
        # don't execute all of them, as that would often be way too strong
        iaa.SomeOf((0, 5),
            [
                sometimes(iaa.Superpixels(p_replace=(0, 1.0), n_segments=(20, 200))), # convert images into their superpixel representation
                iaa.OneOf([
                    iaa.GaussianBlur((0, 3.0)), # blur images with a sigma between 0 and 3.0
                    iaa.AverageBlur(k=(2, 7)), # blur image using local means with kernel sizes between 2 and 7
                    iaa.MedianBlur(k=(3, 11)), # blur image using local medians with kernel sizes between 2 and 7
                ]),
                iaa.Sharpen(alpha=(0, 1.0), lightness=(0.75, 1.5)), # sharpen images
                iaa.Emboss(alpha=(0, 1.0), strength=(0, 2.0)), # emboss images
                # search either for all edges or for directed edges,
                # blend the result with the original image using a blobby mask
                iaa.SimplexNoiseAlpha(iaa.OneOf([
                    iaa.EdgeDetect(alpha=(0.5, 1.0)),
                    iaa.DirectedEdgeDetect(alpha=(0.5, 1.0), direction=(0.0, 1.0)),
                ])),
                iaa.AdditiveGaussianNoise(loc=0, scale=(0.0, 0.05*255), per_channel=0.5), # add gaussian noise to images
                iaa.OneOf([
                    iaa.Dropout((0.01, 0.1), per_channel=0.5), # randomly remove up to 10% of the pixels
                    iaa.CoarseDropout((0.03, 0.15), size_percent=(0.02, 0.05), per_channel=0.2),
                ]),
                iaa.Invert(0.05, per_channel=True), # invert color channels
                iaa.Add((-10, 10), per_channel=0.5), # change brightness of images (by -10 to 10 of original value)
                iaa.AddToHueAndSaturation((-20, 20)), # change hue and saturation
                # either change the brightness of the whole image (sometimes
                # per channel) or change the brightness of subareas
                iaa.OneOf([
                    iaa.Multiply((0.5, 1.5), per_channel=0.5),
                    iaa.FrequencyNoiseAlpha(
                        exponent=(-4, 0),
                        first=iaa.Multiply((0.5, 1.5), per_channel=True),
                        second=iaa.ContrastNormalization((0.5, 2.0))
                    )
                ]),
                iaa.ContrastNormalization((0.5, 2.0), per_channel=0.5), # improve or worsen the contrast
                iaa.Grayscale(alpha=(0.0, 1.0)),
                sometimes(iaa.ElasticTransformation(alpha=(0.5, 3.5), sigma=0.25)), # move pixels locally around (with random strengths)
                sometimes(iaa.PiecewiseAffine(scale=(0.01, 0.05))), # sometimes move parts of the image around
                sometimes(iaa.PerspectiveTransform(scale=(0.01, 0.1)))
            ],
            random_order=True
        )
    ],
    random_order=True
)

images_aug = seq.augment_images(images)
Example: Visualize Augmentations
아래 코드로 시각화 역시 가능합니다. 다만 input 이미지가 0~255 사이값을 가진다는 특징이 있습니다. (다른 함수도 마찬가지!)
import numpy as np
import imgaug.augmenters as iaa


images = np.random.randint(0, 255, (16, 128, 128, 3), dtype=np.uint8)
seq = iaa.Sequential([iaa.Fliplr(0.5), iaa.GaussianBlur((0, 3.0))])

# Show an image with 8*8 augmented versions of image 0 and 8*8 augmented
# versions of image 1. Identical augmentations will be applied to
# image 0 and 1.
seq.show_grid([images[0], images[1]], cols=8, rows=8)
Example : Augment Images and Keypoints
imgaug 의 강력한 기능입니다. Keypoints / Landmarks 역시 같이 augmentation이 가능하기 때문에 yolo같은 object detection 모델에서도 사용가능합니다!
import numpy as np
import imgaug as ia
import imgaug.augmenters as iaa
from imgaug.augmentables.kps import KeypointsOnImage


images = np.random.randint(0, 50, (4, 128, 128, 3), dtype=np.uint8)

# Generate random keypoints, 1-10 per image with float32 coordinates
keypoints = []
for image in images:
    n_keypoints = np.random.randint(1, 10)
    kps = np.random.random((n_keypoints, 2))
    kps[:, 0] *= image.shape[0]
    kps[:, 1] *= image.shape[1]
    keypoints.append(kps)

seq = iaa.Sequential([iaa.GaussianBlur((0, 3.0)),
                      iaa.Affine(scale=(0.5, 0.7))])

# augment keypoints and images
images_aug, keypoints_aug = seq(images=images, keypoints=keypoints)

# Example code to show each image and print the new keypoints coordinates
for i in range(len(images)):
    print("[Image #%d]" % (i,))
    keypoints_before = KeypointsOnImage.from_xy_array(
        keypoints[i], shape=images[i].shape)
    keypoints_after = KeypointsOnImage.from_xy_array(
        keypoints_aug[i], shape=images_aug[i].shape)
    image_before = keypoints_before.draw_on_image(images[i])
    image_after = keypoints_after.draw_on_image(images_aug[i])
    ia.imshow(np.hstack([image_before, image_after]))

    kps_zipped = zip(keypoints_before.keypoints,
                     keypoints_after.keypoints)
    for keypoint_before, keypoint_after in kps_zipped:
        x_before, y_before = keypoint_before.x, keypoint_before.y
        x_after, y_after = keypoint_after.x, keypoint_after.y
        print("before aug: x=%d y=%d | after aug: x=%d y=%d" % (
            x_before, y_before, x_after, y_after))
그럼 실제 코드에서는 어떻게 적용이 가능할까요??
케라스
케라스에는 fit_generator라는 함수가 있습니다. generator를 통해 배치 사이즈만큼 데이터를 뽑아내는데, 이 때 정의한 do_augmentation 함수를 통해 augmentation을 할 수 있습니다. 아래는 segmentation에서 augmentation을 하기위해 직접 구현한 함수입니다.
    def generator(self, features, labels, batch_size):
        batch_features = np.zeros((batch_size, 128, 128, 3))
        batch_labels = np.zeros((batch_size, 128, 128, 1))
        while True:
            for i in range(batch_size):
                index = random.randint(0, len(features)-1)
                random_augmented_image, random_augmented_labels = self.do_augmentation(self.seq_det, features[index], labels[index])
                batch_features[i] = random_augmented_image
                batch_labels[i] = random_augmented_labels
            yield batch_features, batch_labels

    def do_augmentation(self, seq_det, x_train, y_train):
        ret_y_train = np.zeros((128,128,1))
        ret_y_train[:,:,:1] = y_train

        aug_x_train = seq_det.augment_images([x_train])[0]
        aug_y_train = seq_det.augment_images([ret_y_train])[0]

        ret_x_train = aug_x_train
        ret_y_train = aug_y_train
        return ret_x_train, ret_y_train[:,:,:1]
파이토치
파이토치는 적용하기가 더 쉬운 편입니다.
colab 링크 : https://colab.research.google.com/drive/109vu3F1LTzD1gdVV6cho9fKGx7lzbFll
Google Colaboratory
colab.research.google.com
핵심적인 부분만 보여드리면 우선 아래와 같이 imgaug를 이용해 Transform을 실행하는 ImgAugTransform을 정의합니다.
class ImgAugTransform:
  def __init__(self):
    self.aug = iaa.Sequential([
        iaa.Scale((224, 224)),
        iaa.Sometimes(0.25, iaa.GaussianBlur(sigma=(0, 3.0))),
        iaa.Fliplr(0.5),
        iaa.Affine(rotate=(-20, 20), mode='symmetric'),
        iaa.Sometimes(0.25,
                      iaa.OneOf([iaa.Dropout(p=(0, 0.1)),
                                 iaa.CoarseDropout(0.1, size_percent=0.5)])),
        iaa.AddToHueAndSaturation(value=(-10, 10), per_channel=True)
    ])

  def __call__(self, img):
    img = np.array(img)
    return self.aug.augment_image(img)

transforms = ImgAugTransform()

dataset = torchvision.datasets.ImageFolder('pytorch-examples/data/', transform=transforms)
기존의 torch의 transforms 함수와 같이 쓰고 싶다면 아래와 같이 구현합니다.
from torchvision import datasets, transforms

# Define a transform to normalize the data
transform = transforms.Compose([# transforms.RandomRotation(20),
                                aug_transforms,
                                transforms.ToTensor(),
                                transforms.Normalize([0.5, 0.5, 0.5], [0.5, 0.5, 0.5])])
그리고 loader를 아래와 같이 만들면 되겠죠.
# Download and load the training data
trainset = datasets.CIFAR10('~/.pytorch/MNIST_data/', download=True, train=True, transform=transform)
trainloader = torch.utils.data.DataLoader(trainset, batch_size=64, shuffle=True)

# Download and load the test data
testset = datasets.CIFAR10('~/.pytorch/MNIST_data/', download=True, train=False, transform=transform)
testloader = torch.utils.data.DataLoader(testset, batch_size=64, shuffle=True)
그럼 단점과 개선방향에는 어떤 것이 있을까요??
1. batch 에 대하여 augmentation이 들어가므로 연산이 더 들어간다. == 느려진다.
- 개선 방법 : keras의 벡엔드 함수로 GPU 연산으로 augmentation 을 구현한다.(난이도 상)
2. 픽셀이 0~255으로 맞춰줘야 한다. == MRI 같이 가변적인 픽셀값에 대하여 적용하기 힘들다.
- 개선 방법 : .......
'딥러닝' 카테고리의 다른 글
| Text to Speech 딥보이스 3 돌려만보기 - Deep Voice 3 (Pytorch) (1) | 2020.06.01 |
|---|---|
| Yolo v3 논문 리뷰 (0) | 2019.09.18 |
| CycleGAN Implementataion 코드에 Wasserstein loss 추가하기(Pytorch) (0) | 2019.09.08 |
| Tensorflow 2.0 Neural Style Transfer 튜토리얼 (5) | 2019.05.14 |
| Image Super Resolution Evaluation Metric 케라스 구현 (0) | 2019.05.11 |


